

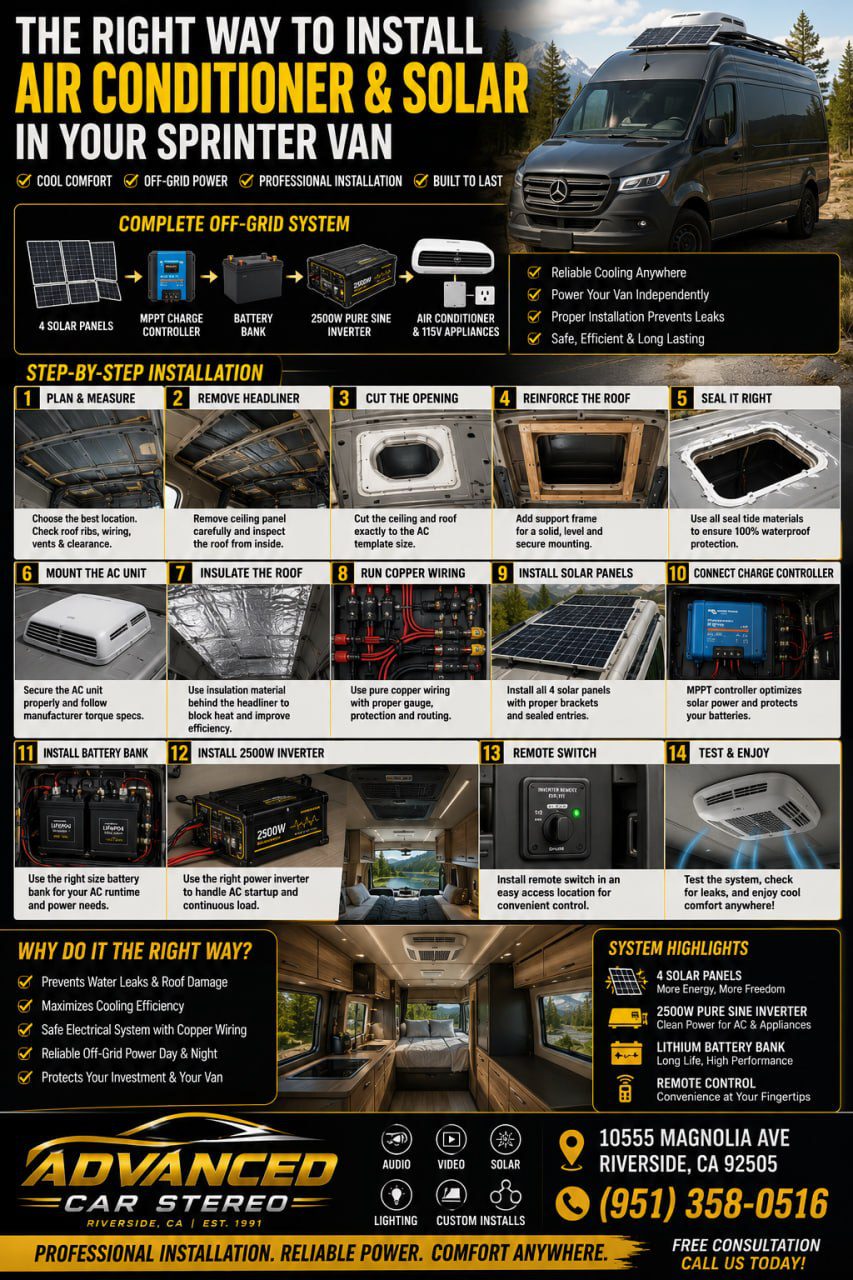
Installing an air conditioner on a Mercedes-Benz Sprinter van requires much more than placing a unit on the roof and connecting a few wires. A professional installation must protect the roof structure, prevent water leaks, support the electrical load, control heat and condensation, and provide enough stored energy to operate the air conditioner safely.
A complete Sprinter van cooling system may include a rooftop air conditioner, four solar panels, an MPPT solar charge controller, a properly sized battery bank, a pure sine wave inverter, shore-power integration, circuit protection, copper wiring, roof insulation and a conveniently located remote switch.
At Advanced Car Stereo Riverside, we approach Sprinter van air-conditioning and solar installations as a complete power-management project—not simply an appliance installation.
Why Proper Planning Comes Before Cutting the Roof
Before making any opening in the van, the installer must determine exactly what type of air conditioner will be used. Some van air conditioners operate directly from a 12-volt, 24-volt or 48-volt battery system. Other rooftop RV air conditioners require 115-volt AC power and must be supplied by shore power, a generator or an inverter connected to the house battery bank.
The installer must identify the air conditioner’s operating voltage, continuous power consumption, compressor startup demand, cooling capacity, roof-opening dimensions, roof thickness requirements, interior and exterior clearances, total rooftop weight, and battery capacity required for the customer’s desired runtime.
The customer’s intended use must also be discussed. A person who wants cooling for an hour during lunch has a very different power requirement from someone who wants to run air conditioning throughout the night while camping.
Step 1: Review the Mercedes-Benz Sprinter Upfitting Requirements
A Sprinter roof should never be cut based only on the air conditioner’s paper template. Mercedes-Benz publishes Body and Equipment Guidelines containing technical specifications and limitations for companies modifying Sprinter vans. Before selecting the final location, the installer should check roof-support ribs, factory wiring harnesses, antenna and communication components, interior lighting, side-curtain airbag areas, roof seams, existing vents or fans, solar-panel placement, future maintenance access, weight distribution, and interior cabinet and headliner locations.
Step 2: Remove the Headliner and Inspect the Roof from Inside
The professional approach is to remove or carefully lower the relevant portion of the headliner before cutting. Cutting from outside without first inspecting the interior can damage wiring, lighting, insulation or structural components hidden below the sheet metal. Once the area is exposed, the technician can identify the safest route for air-conditioner power wiring, solar-panel cables, thermostat wiring, remote-control wiring, and battery-monitor communication cables. A professional installer will measure several times because a roof opening cannot simply be moved after it has been cut.
Step 3: Cut the Ceiling and Roof Correctly
After the final location is confirmed, the interior ceiling material and exterior roof skin can be prepared according to the air-conditioner manufacturer’s template. The van must be protected from metal filings and cutting debris. After cutting, the edges should be deburred and smoothed, cleaned of metal shavings, protected against corrosion, and prepared for the required reinforcement or support frame. Leaving exposed raw steel around the opening can eventually allow corrosion to develop underneath the seal.
Step 4: Reinforce the Roof Opening
A Sprinter roof is not always designed to support a heavy rooftop appliance through thin sheet metal alone. The opening may require an interior support ring or engineered reinforcement to maintain the correct shape, give the mounting hardware a solid surface, and distribute the clamping force over a larger area. The air conditioner should sit level according to the manufacturer’s instructions, following the specified tightening sequence and torque requirements.
Step 5: Use the Correct Gasket and Seal-Tight Materials
Waterproofing is one of the most important parts of a Sprinter rooftop air-conditioner installation. The installer should use the gasket, sealing system and compatible materials specified for the particular air conditioner and roof construction. A generic household silicone should not be treated as a universal solution. After installation, the roof should receive a controlled water test, and the seal should be inspected periodically as part of normal vehicle maintenance.
Step 6: Use Properly Sized Copper Wiring
The correct wire is determined by voltage, current, circuit length, allowable voltage drop, temperature, insulation rating and circuit protection. We recommend using properly sized, high-quality copper conductors rather than undersized wire or copper-clad aluminum shortcuts. This is especially important on the battery side of a high-powered inverter — a 12-volt inverter supplying a large air conditioner may require very high DC current. Undersized wiring can create excessive voltage drop, heat and inverter shutdowns. Cable penetrations must use grommets, bushings or sealed cable glands.
Step 7: Install Insulation Behind the Headliner
An air conditioner cannot perform efficiently if the Sprinter van is absorbing and transferring excessive heat through the roof and walls. Proper insulation behind the headliner helps reduce heat transfer and allows the cooling system to reach and maintain a comfortable interior temperature more effectively. A well-insulated van places less demand on the compressor, improving comfort and conserving stored battery energy. Window coverings, wall insulation, insulated flooring and thermal curtains may also make a substantial difference.
Step 8: Design the Roof Layout for Four Solar Panels
Four solar panels can be a valuable part of the system, but the number alone does not tell us how much energy the system will produce. Four 100-watt panels and four 250-watt panels create very different systems. The roof layout should be completed before either the solar panels or air conditioner is installed, with panels positioned to reduce shading from the rooftop air conditioner, roof racks, vent fans, and other rooftop equipment. The panels may be connected in series, parallel or a combination of both depending on the panels’ electrical ratings and the solar charge controller’s input limits.
Step 9: Install the Correct Solar Charge Controller
The solar panels should not normally be connected directly to the house batteries. A compatible solar charge controller regulates the energy from the panels and charges the battery bank according to the battery manufacturer’s requirements. An MPPT controller is commonly selected for larger van systems because it can manage higher solar-array voltages and convert available panel power to the battery’s charging requirements. The controller’s charging profile must be configured for the exact battery type — a lithium battery and a traditional lead-acid battery do not use the same charging settings.
Step 10: Size the Battery Bank for the Customer’s Real Needs
Solar panels produce energy only when sufficient light is available. The battery bank stores that energy so the air conditioner can operate when clouds pass, when the vehicle is parked in shade or after the sun goes down. The battery bank — not simply the number of solar panels — determines how long the air conditioner can operate without another charging source. Lithium iron phosphate batteries are frequently used in modern van conversions because of their usable capacity and cycle performance, but the battery bank must include an appropriate battery-management system and charging equipment.
Step 11: Choose the Right Inverter for the Air Conditioner
An inverter converts battery DC power into AC power for a 115-volt air conditioner. The inverter must support both the air conditioner’s normal running demand and its compressor-starting demand. For a compressor-driven air conditioner, we generally recommend a properly sized pure sine wave inverter. Modified sine wave inverters may operate certain simple loads, but appliances using AC motors and compressors may operate less efficiently or not at all. An existing 2,000-watt modified sine wave inverter should not automatically be assumed suitable for a rooftop air conditioner — the air conditioner’s requirements, inverter continuous rating, surge rating, battery voltage and wiring must all be verified.
Step 12: Install an Accessible Remote Switch
A remote inverter switch allows the customer to control the inverter without opening a cabinet or accessing the electrical compartment. The remote should be placed where the driver or occupants can reach it conveniently. Depending on the selected equipment, the remote may provide inverter on/off control, charger-only mode, battery information, fault warnings, temperature warnings, and shore-power status.
Step 13: Add Shore Power and Alternator Charging When Appropriate
Solar power alone may not replace all the energy consumed by an air conditioner, especially during hot weather, nighttime operation or shaded parking. A complete Sprinter power system may include solar panels through an MPPT controller, the vehicle alternator through a DC-to-DC charger, and shore power through an inverter-charger or battery charger. An inverter-charger can simplify the system by combining AC power conversion, battery charging and automatic power transfer.
Step 14: Test the Complete Installation
The project is not complete when the air conditioner first turns on. A professional commissioning process should include roof leak testing, battery-cable inspection, fuse and breaker verification, solar-array voltage and polarity testing, charge-controller programming, inverter startup testing, air-conditioner compressor startup testing, remote-control testing, shore-power transfer testing, and road testing for movement, noise and vibration. The owner should receive a full explanation of how to operate the system, what appliances can run together, and when to use shore power or alternator charging.
Common Sprinter Air-Conditioning Installation Mistakes
- Cutting the roof before checking structural ribs and hidden wiring
- Installing the air conditioner without reinforcing the opening
- Using the wrong sealant or an incompatible gasket method
- Expecting solar panels to run the air conditioner directly
- Using an undersized battery bank
- Using an inverter that cannot support compressor startup
- Using modified sine wave power without manufacturer approval
- Installing undersized wiring or omitting properly sized fuses
- Placing the inverter in a sealed, unventilated compartment
- Mounting solar panels where the air conditioner shades them
- Failing to test for leaks and heat after installation
Professional Sprinter Van Air Conditioner and Solar Installation in Riverside, CA
At Advanced Car Stereo Riverside, we can design a complete Sprinter van cooling and electrical solution around your vehicle and the way you plan to use it. Our installation can include a rooftop Sprinter van air conditioner, professional roof cutting and reinforcement, manufacturer-approved sealing system, roof and headliner insulation, four-panel solar package, MPPT solar charge controller, lithium or compatible auxiliary battery bank, pure copper power wiring, pure sine wave inverter or inverter-charger, remote inverter switch, battery-monitoring system, shore-power integration, alternator charging, circuit protection and disconnects, and final load, temperature and leak testing.
We do not simply place products in the vehicle. We design the air conditioner, solar panels, battery bank, inverter and wiring to work together as one complete system.
Schedule Your Sprinter Van Installation
Get dependable cooling for traveling, camping, mobile work, family trips or off-grid adventures.
Advanced Car Stereo
10555 Magnolia Ave., Riverside, CA 92505
Call: (951) 358-0516
Professional Sprinter upgrades. Proper power. Reliable cooling. Clean installation.


